Sunday, January 30, 2011

{Be my valentine}

Tell him his {good} fortune
~Thinking ahead about valentines~

Make your own fortune cookies and place a sexy or loving saying inside each one.  He'll be sure to eat it up as you tell him what you want done and where you want it.   


Fortune Cookie Recipe

Ingredients

  • 1 egg white
  • 1/8 teaspoon vanilla extract
  • 1 pinch salt
  • 1/4 cup unbleached all-purpose flour
  • 1/4 cup white sugar

Directions

  1. Preheat oven to 400 degrees F. Butter a cookie sheet. Write fortunes on strips of paper about 4 inches long and 1/2 inch wide. Generously grease 2 cookie sheets.
  2. Mix the egg white and vanilla until foamy but not stiff. Sift the flour, salt, and sugar and blend into the egg white mixture.
  3. Place teaspoonfuls of the batter at least 4 inches apart on one of the prepared cookie sheets. Tilt the sheet to move the batter into round shapes about 3 inches in diameter. Be careful to make batter as round and even as possible. Do not make too many, because the cookie have to be really hot to form them and once they cool it is too late. Start with 2 or 3 to a sheet and see how many you can do.
  4. Bake for 5 minutes or until cookie has turned a golden color 1/2 inch wide around the outer edge of the circle. The center will remain pale. While one sheet is baking, prepare the other.
  5. Remove from oven and quickly move cookie with a wide spatula and place upside down on a wooden board. Quickly place the fortune on the cookie, close to the middle and fold the cookie in half. Place the folded edge across the rim of a measuring cup and pull the pointed edges down, one on the inside of the cup and one on the outside. Place folded cookies into the cups of a muffin tin or egg carton to hold their shape until firm.
yields 1 doz cookies


Nutritional Information open nutritional information

Amount Per Serving  Calories: 54 | Total Fat: 0.1g | Cholesterol: 0mg

A Healthy You

Have you ever vowed to lose weight? Get healthy? Feel better? I’m sure these sound familiar, especially since we’re in the midst of resolution season! To make things a little easier on you, I’m going to “spotlight” various workout programs aimed at helping you achieve those goals! I’ll also throw in some other fitness tips, insight into eating better, and overall guidance on living a healthier, better life.
First order of business: Getting started. Trust me when I tell you that there is no better time than NOW to start. Be honest with yourself: Is it really going to get any easier if you start next week? Is life going to all of a sudden slow down? Get less hectic? Unless you make a commitment to yourself and your health, that time that you PROMISED to set aside next week to work out will magically fill up with various social, work, and/or family activities. You’ll always find a way to justify it. “Oh, my friend is in town and I haven’t seen her forever!” “My son’s game is tonight and I can’t miss it!” “I really need to stay late at work and finish up some stuff.” I understand that life happens, but that doesn’t mean that your workouts have to take a backseat to it. So what do you do to prevent your crazy life from sabotaging your fitness goal(s)? Aim for a bare minimum of ten minutes a day. Just ten, especially when you’re getting started. Everyone has ten minutes a day, even if that means waking up ten minutes earlier. Whether you run in place, do jumping jacks, squats, lunges, or calf raises while you’re brushing your teeth, at least you’re doing SOMETHING fitness-related. Even if you do five minutes in the morning and five at night (NOT right before bedtime!), get those ten minutes in! This ten-minutes a day tool is fantastic for other reasons as well. Feeling blah or energy-depleted? Exercise for ten minutes for a quick boost of energy and feel-good endorphins. This especially helps when you’ve been engaged in something that’s mentally taxing. Also, lacking motivation to work out today? Tell yourself that you just have to do ten minutes and then you can call it quits. More often than not, it feels so good after those ten minutes are up, you’ll add another ten, and then another. Even if you don’t, though, at least you did something to work toward your goal.
Second order of business: Make it official! WRITE IT DOWN. Be as specific as possible. What exactly is it that you're looking to achieve? Is it to have more energy? Boost your immune system? Fit into a pair of jeans? Be able to run a 10k? By writing it down, you'll be cementing that goal and making it real.
Bottom line to remember: The struggle and sacrifice of exercise if you do work out is much easier than the pain and sacrifice of bad health if you don’t. YOU CAN DO IT!!!

Mags

i heart these mags:

tiger toes rawr!

Welcome to the jungle.  Whether your a sex kitten or ferocious lion check out these easy to do "tiger toes"  I also do them for people for a mere $10.00 (thats cheaper than a pedi!!)!  Email me at crystalbrooke13@gmail.com to set up a time or find me on facebook. 

fast drying top coat=my super secret weapon
nail paints

preping

Choose a background color


Friday, January 21, 2011

all things chanel

style is so subjective.  i say pick a style according to what you like and be true to your choices.  i have learned that being inspired by others does not make you a follower, it molds you to be open and appreciative to others choices and shining moments.  it helps you learn from their fashion mistakes and how not make your own. style is public.  style is a choice. style can be changed, warped, distorted and reused. style is green.
     
I love how she paired the denim jacket under the blazer.  The stripes just scream Chanel, well actually just whisper seductively.

Here is a lovely idea from highglossblue.com
The CHANEL logo is so iconic.  Graphic in classic black and white, I'm pretty sure those Cs would look good anywhere.  When I saw this fabulous tray at an antique dealer's open house right before Christmas, I wanted it.  At $250+, I also thought it looked pretty easy to DIY.  And you know what, I sure am glad I gave it a shot because I'm loving all the possibilities this little DIY process opens up.  2011 is all about possibility!  So in honor of the new year, here are the steps-
So I picked up a black lacquer tray for $10 at Target.  Then I Google imaged the Chanel logo and traced it directly from my mom's monitor.  I work from a 12" laptop which is a little smaller than I wanted the image. If you do too, just blow the image up after you trace it.
Using an Exacto knife, I cut out the logo.  Because I was at my parents' house, NYTimes magazine stood in for my cutting mat. 
Using the cut out as a stencil, I traced the image onto Frisket Film, a low tack contact paper.  The Frisket Film prevents any paint bleed out and gave my letters a pretty clean edge.
Last, I smoothed my Frisket Film over my Target tray making sure to get out any wrinkles where paint might seep out.  I taped newsprint print around the logo to cover up any exposed surface area and gave the tray a few quick coats of white spray paint.  I used Krylon Fusion for Plastic in a satin finish and let each coat dry for about 10 minutes each.
After letting the paint dry for about 2 hours (long enough for it to firm up, but short enough so it doesn't fully cure and stick to the Frisket Film), I pulled back the film and VOILA! 

Thursday, January 13, 2011

The Company

 The Company

The Company is a non-profit dance company designed to give a positive environment for adult dancers to continue their art in the community. They are a performance-based group and have performed in various settings through out the community. The Company has also produced their own showcase featuring pieces created and performed by members, as well as local studios. They will be holding auditions for our spring season on Saturday, January 15th at 10:00 am. Auditions will be held at Dance Factory Dance Studio. For more information check us out on Facebook or email us at dance_thecompany@gmail.com


The Founding Five

Britney

Courtney

Tyrone

Let there be light

Lighting can be one of the most essential parts of home decor.  It can set the mood, highlight art, and create an ambiance like nothing else.  I am personally a fan of lamps and large conversational pieces.  Here are a few on my top five affordable lamps with one splurge:

I had a friend who re created this lamp. it looked smashing


IKEA.......aka My Happy Place

KNUBBIG
Table lamp $9.99


KALLT
Decoration lighting $39.99
-For a large statement piece like this, this is killer deal!


~I personally own the lamp below and want more of them!!  They look great on window or on a shelf.  

GRÖNÖ
Table lamp $6.99


VÄTE
Pendant lamp shade $6.00


SPLURGE:
MASKROS
Pendant lamp $49.99


here it is in a room

LAGRA
Floor/ reading lamp $9.99


These are great for reading!  I love them when they are placed over the side of a couch or bed.


Sunday, January 9, 2011

It's all about the {antlers}

Yep, that's right, antlers.  Who would have thought your grandpas old set of antlers in the garage, covered in dust would help catapult you into a trendsetting era of home decor.  My personal fav is the all white "ghost antler coat rack" by designer Erich Grinder.  For a small fee of $230.00 they can be yours at velocity.com. Ghost Antler Coat Rack In White
Ghoast antler coat rack by Erich Grinder

If you like me (eeehhem, cheap??) try making your own.  Follow the instructions below...

what you will need:
computer/printer
deer template
1 sheet of foam core
spray adhesive
wrapping paper, or other large paper
accent paper, if desired
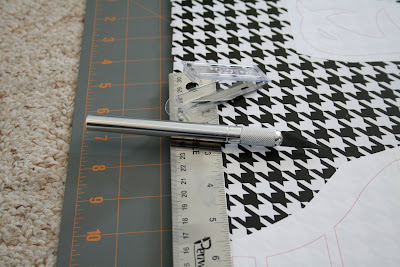
xacto knife and fresh blades
cutting mat
paper clip or wire

first, get your sheet of foam core.
spray one side lightly with spray mount.
i used super 77--i happen to LOVE this stuff,
but any spray adhesive will do.
i laid out my wrapping paper on the floor
and used cans to keep the ends from curling up.
of course, i used my houndstooth wrapping paper,
but you could use any pattern!
after laying the foam core one one side of the paper,
i smoothed out any bubbles, then
sprayed the other side with spray adhesive,
and adhered the paper to the other side.
trim off the excess...
and again, carefully smooth out any bubbles.
print your template,
attach the pieces together with tape,
and trim around them.
i VERY lightly sprayed the backs of my
pieces with spray adhesive, 
and then laid them out on the foam core.
the secret to getting a 
good cut with foam core?
sharp blades!!
i went through three blades 

for this project!
carefully cut out your shapes...
i found it helpful to use a cork-backed metal 
blade for all of the straight cuts.
(no, i am not left handed, i just love y'all so much 
that i held the camera in my right hand and
pretended to cut with my left hand...
so you could get a good visual.
man, am i nice, or what?)
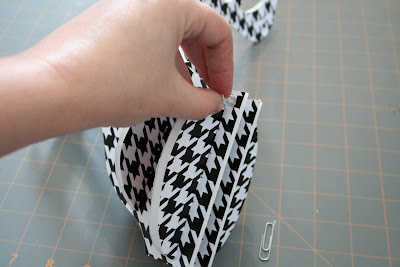
once all the pieces are cut,
carefully remove the template paper from the
finished piece, and assemble.
(even though the instructions say to use a thicker
piece of foam core for the "mount", 
i used the same thickness and it turned out fine.)
i used a push in to make two holes 
for the hanger.
i unfolded a paper clip
to use as a hanger because i couldn't find any wire!
here is the finished product!
i used a contrasting paper for the mount.


here is the "original" one on the 
i love the fun pink paper mixed with the faux bois!

this was a fun little
"finishing touch" project
that i completed this week 
for my son's room.

Idea above found at Remodelaholic