Friday, September 30, 2011

fun letters

i wish i used the snail mail more often
maybe ill try and find a pen pal 

Thursday, September 29, 2011

num num

Nutella Mug Cake Ingredients 4 tablespoons self rising flour 4 tablespoons sugar 1 egg 3 tablespoons cocoa powder 3 tablespoons Nutella 3 tablespoons milk 3 tablespoons olive or vegetable oil Method Combine all ingredients in a large coffee mug. Whisk well with a fork until smooth. Microwave on high for 1 1/2 – 3 minutes. (Time depends on microwave wattage. Mine took 1 /2 minutes.) Top with whipped cream and a little chocolate sauce if desired. 
wow sounds like heaven in a mug...
have a lovely day,
xoxo
b

family photos

thanks molly :)
thanks

Wednesday, September 28, 2011

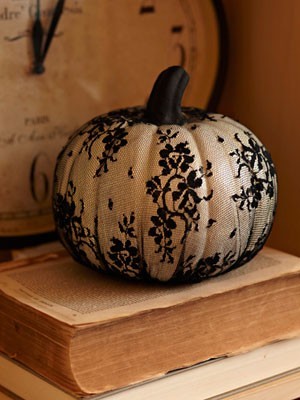
Hey Pumpkin!

just can't help myself
can't wait for 
Halloween to get here!!
and of course these don't help...
http://greeneyed.com/wp-content/uploads/2010/10/IMG_0275.jpg
above: made of old lace tights. secured at top with a rubber band
 
http://blowoutparty.com/blog/wp-content/uploads/2010/10/chalk-pumpkins.jpg 
http://www.countryliving.com/cm/countryliving/images/Tg/painted-pumpkin-1009-de.jpg 
http://cfabbridesigns.com/blog/wp-content/uploads/2010/10/IMG_5277.jpg 

http://hgtv.sndimg.com/HGTV/2011/06/17/Original_Janell-Beals-decorative-Halloween-pumpkins-step-6_s4x3_lg.jpg 
http://crossstitcher.themakingspot.com/resources/crossstitch/Halloween2010_2.jpg

counting down the days
xoxo
b

Tuesday, September 27, 2011

honestly wtf

One of my new fav blogs
thanks to my fav gal pal and sista
"whit-the-shit"
cause quite frankly she is the shiznit


You’ll need:

  • a 6″ x 3.5″ piece of velvet
  • a 0.75″ x 2.5″ piece of velvet
  • a 1″ pin back
  • a glue gun
  • a ruler
  • a pen
Start by drawing a vertical line and a horizontal line, dividing the rectangle into 4 equal quarters. Pinch the intersecting lines and pick up the velvet.
Flip the piece over, while still pinching the backside, and place a drop of hot glue in the center. Fold the velvet in half lengthwise, pressing the two sides closed. Place a drop a of glue on backside, along the vertical line and close to the folded edge. Fold the fabric back and press the two sides closed. This is the accordion-like fold that will be repeated.
Place another drop of glue on the front side and fold the fabric closed. Continue the steps until both sides.
Turn the bow on its backside and glue the tip of the velvet strip to the center. Wrap the strip around the bow and seal it closed.
Glue a pin back to the back of the bow.
Your velvet bow tie is finished!
Boy, oh boy . . .
(top image by TommyTon, rest of images by HonestlyWTF)
xoxo
b

Wednesday, September 21, 2011

fabulous fall recipe

http://www.recipetips.com/images/recipe/beverages/apple_cider_spiced.jpg
i fully intend on making this
this weekend
using fresh apples and a juicer 
num num num...

Ingredients

  • 6 cups apple cider
  • 1/4 cup real maple syrup
  • 2 cinnamon sticks
  • 6 whole cloves
  • 6 whole allspice berries
  • 1 orange peel, cut into strips
  • 1 lemon peel, cut into strips

Directions

  1. Pour the apple cider and maple syrup into a large stainless steel saucepan.
  2. Place the cinnamon sticks, cloves, allspice berries, orange peel and lemon peel in the center of a washed square of cheesecloth; fold up the sides of the cheesecloth to enclose the bundle, then tie it up with a length of kitchen string. Drop the spice bundle into the cider mixture.
  3. Place the saucepan over moderate heat for 5 to 10 minutes, or until the cider is very hot but not boiling.
  4. Remove the cider from the heat. Discard the spice bundle. Ladle the cider into big cups or mugs, adding a fresh cinnamon stick to each serving if desired.

Tuesday, September 20, 2011

t-shirt latch hook rug

saw this on a friends facebook
love it
love her
enjoy...

idea credit here

Supplies:
Latch hook canvas
latch hook tool
old t-shirts
scissors or rotary cutting tool/mat
seam binding
masking tape
dye (optional)
All of these things should be available at your local craft store, with the exception of the old t-shirts. I found thrift stores that were doing bag sales and loaded my bags up with white t-shirts. I also asked my local freecyclers if they had any white t-shirts to spare. I was able to purchase all of the supplies, including shirts, for under $25.
On to the making! The first thing that you want to do is plan. Decide how large you would like your rug to be and what colors/designs you would like. I chose to just make it one all one color, battleship gray (much to the chagrin of my submariner husband!). Estimate how many shirts you’ll need because if you’re dyeing them, as I did, you’ll want to dye them all in one batch to get consistant color. I found that I needed 70 strips to fill one square (latch hook canvas is pre-printed with a grid), and that I could get approximately 250 strips for the average men’s t-shirt. Thus, I would need 2 shirts for every 7 squares. These numbers are a good starting point, but may need to be adjusted according to your design needs.
note: I chose to make this rug very thick. The 2 shirts for every 7 squares number is based on a very tight and very high piled rug. Super results can be achieved with less. I reccomend using half of this number if you’re making a larger rug, to save on time, and to reduce the bullk of the finished rug.
Once you’ve gathered all of your shirts, use a rotary cutting tool and mat (you can certainly use scissors but the results are less precise) to cut the shirts into 1 inch strips. It was easiest for me to fold the shirt in half, shoulder to shoulder and cut strips from the trunk of the shirt, up to the collar. It is important to make sure that the shirt is smooth and flat when cutting, or you’ll end up with uneven or jagged strips. All of these strips should then be cut into 4 inch segments. This cutting phase easily took me 20 hours (I was cutting up 51 shirts!).
a full box of t-shirt strips
Once you have all of the strips cut, it’s time to dye them if you’d like. I used Rit dye and just dumped them all into the washing machine.
dyeing the fabric strips
t-shirt strips clog the dryer
Once your strips are all ready to go, tape the edges of the latch hook canvas with the masking tape so that they won’t pull apart while your latching.
latch hook sides
Now you’re ready to hook! From the front of your rug, isolate a strand of the canvas with the latch hook tool. Make a loop with the t-shirt strip and place it on the end of the tool. Pull the latch hook tool down, through the canvas, pulling the t-shirt strip with it, leaving the strip halfway through the canvas. Slide the tool up to the remaining ends of the t-shirt strip and catch them. Pull them through the loop made by the t-shirt strip below the canvas.
latch hook
I chose to do this with every other available space on my latch hook canvas, and it made a very lush, very high pile rug. You may want to space it out differently for a larger rug, or for a rug with less bulk.
latch hook process
Continue until you run out of strips, or complete the size that you’d like!
latch hook back
When you’re done, bind the edges by hand using seam binding.
Here’s my completed rug, you can see that it gets Jack’s approval!
t shirt latch hook rug
t-shirt rug closeup
larch hook and toes
Jack and the t shirt rug

Monday, September 19, 2011

sorry folks, i'm back

hello lovies,
sorry time has slipped away
and i know exactly where it's gone...
homework :(
last month of my online semester so in other words it's
CRUNCH TIME! 
anyways, i'm back and that's all that matters.
found this on a lovely blog called 
fell in love
can't wait to get more scarves.
you'll see why when you check out the pics below:
 
 
muah!
xoxo
b


Sunday, September 11, 2011

where did all our awesomeness go?

There was a time when you were five years old,
and you woke up full of awesome.
 
You knew you were awesome.
 
You loved yourself.
 
You thought you were beautiful,
even with missing teeth and messy hair and mismatched socks inside your grubby sneakers.
 
You loved your body, and the things it could do.
 
You thought you were strong.
 
You knew you were smart.
  
Do you still have it?
The awesome.
 
Did someone take it from you?
Did you let them?
Did you hand it over, because someone told you weren’t beautiful enough, thin enough, smart enough, good enough?
Why the hell would you listen to them?
Did you consider they might be full of shit?
 
Wouldn’t that be nuts, to tell my little girl below that in another five or ten years she might hate herself because she doesn’t look like a starving and Photoshopped fashion model?
Or even more bizarre, that she should be sexy over smart, beautiful over bold?
Are you freaking kidding me?
 
Look at her. She is full of awesome.
 
You were, once. Maybe you still are. Maybe you are in the process of getting it back.
 
All I know is that if you aren’t waking up feeling like this about yourself, you are really missing out.