
saw this on a friends facebook
love it
love her
enjoy...
idea credit here
Supplies:
Latch hook canvas
latch hook tool
old t-shirts
scissors or rotary cutting tool/mat
seam binding
masking tape
dye (optional)
Latch hook canvas
latch hook tool
old t-shirts
scissors or rotary cutting tool/mat
seam binding
masking tape
dye (optional)
All of these things should be available at your local craft store, with the exception of the old t-shirts. I found thrift stores that were doing bag sales and loaded my bags up with white t-shirts. I also asked my local freecyclers if they had any white t-shirts to spare. I was able to purchase all of the supplies, including shirts, for under $25.
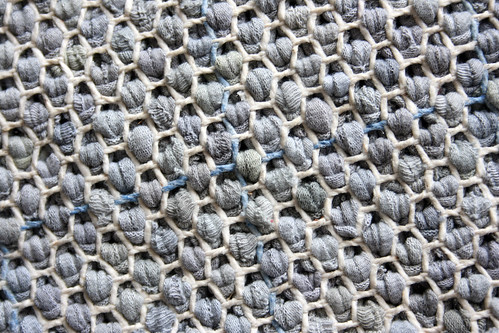
On to the making! The first thing that you want to do is plan. Decide how large you would like your rug to be and what colors/designs you would like. I chose to just make it one all one color, battleship gray (much to the chagrin of my submariner husband!). Estimate how many shirts you’ll need because if you’re dyeing them, as I did, you’ll want to dye them all in one batch to get consistant color. I found that I needed 70 strips to fill one square (latch hook canvas is pre-printed with a grid), and that I could get approximately 250 strips for the average men’s t-shirt. Thus, I would need 2 shirts for every 7 squares. These numbers are a good starting point, but may need to be adjusted according to your design needs.
note: I chose to make this rug very thick. The 2 shirts for every 7 squares number is based on a very tight and very high piled rug. Super results can be achieved with less. I reccomend using half of this number if you’re making a larger rug, to save on time, and to reduce the bullk of the finished rug.
note: I chose to make this rug very thick. The 2 shirts for every 7 squares number is based on a very tight and very high piled rug. Super results can be achieved with less. I reccomend using half of this number if you’re making a larger rug, to save on time, and to reduce the bullk of the finished rug.
Once you’ve gathered all of your shirts, use a rotary cutting tool and mat (you can certainly use scissors but the results are less precise) to cut the shirts into 1 inch strips. It was easiest for me to fold the shirt in half, shoulder to shoulder and cut strips from the trunk of the shirt, up to the collar. It is important to make sure that the shirt is smooth and flat when cutting, or you’ll end up with uneven or jagged strips. All of these strips should then be cut into 4 inch segments. This cutting phase easily took me 20 hours (I was cutting up 51 shirts!).

Once you have all of the strips cut, it’s time to dye them if you’d like. I used Rit dye and just dumped them all into the washing machine.

Once your strips are all ready to go, tape the edges of the latch hook canvas with the masking tape so that they won’t pull apart while your latching.
Now you’re ready to hook! From the front of your rug, isolate a strand of the canvas with the latch hook tool. Make a loop with the t-shirt strip and place it on the end of the tool. Pull the latch hook tool down, through the canvas, pulling the t-shirt strip with it, leaving the strip halfway through the canvas. Slide the tool up to the remaining ends of the t-shirt strip and catch them. Pull them through the loop made by the t-shirt strip below the canvas.
I chose to do this with every other available space on my latch hook canvas, and it made a very lush, very high pile rug. You may want to space it out differently for a larger rug, or for a rug with less bulk.
Continue until you run out of strips, or complete the size that you’d like!
When you’re done, bind the edges by hand using seam binding.
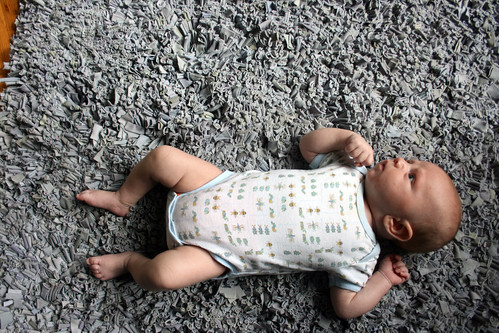
Here’s my completed rug, you can see that it gets Jack’s approval!


This comment has been removed by the author.
ReplyDeleteWow! cool rug!
ReplyDeleteWow! cool rug!
ReplyDelete